

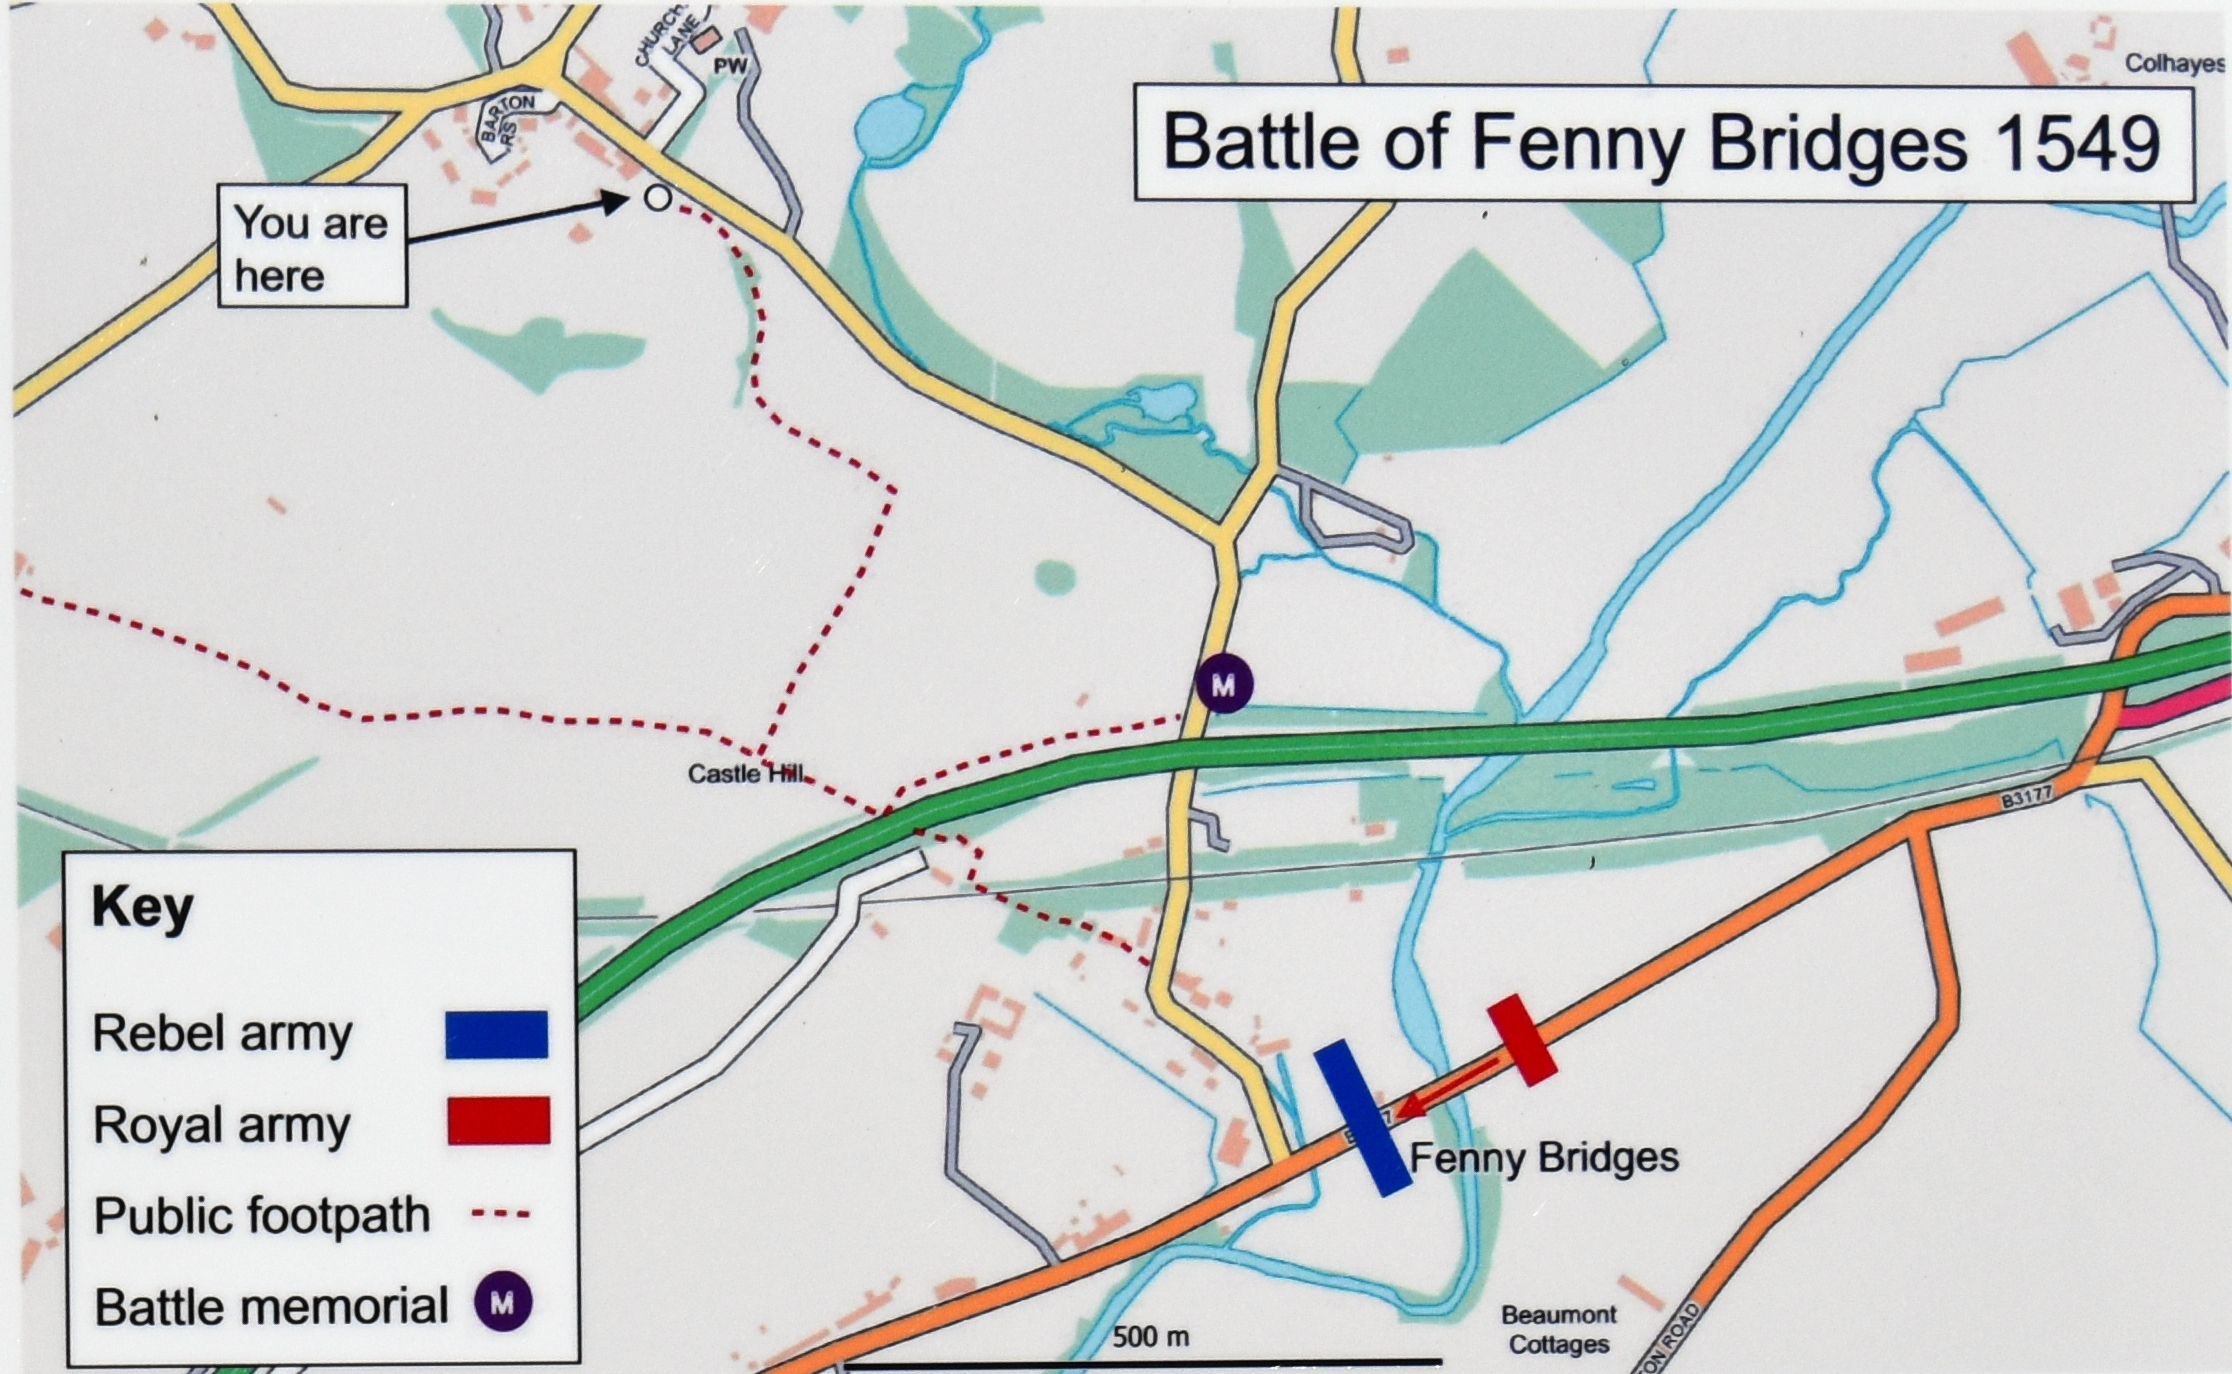
At the end of July 1549 the meadows around Fenny Bridges became the setting for the first major clash of the Prayer Book Rebellion. The royal army had advanced into the South West along the main London–Exeter road and established its headquarters at Honiton, the last market town before Exeter and the essential point at which reinforcements from London could reach them. Ottery St Mary lay closer to the city but off the main road, and Russell could not risk shifting his base until his strength was restored. He waited at Honiton for additional troops to come up, though the delay saw some of his existing forces desert. Only with the financial help of Exeter merchants—who raised funds and men from Bristol, Lyme and Taunton—was the royal army finally able to take the initiative. Skirmishes around Ottery St Mary, where Russell’s troops burned the town but were unable to advance, provoked the rebels into moving eastwards to Fenny Bridges, about three miles from Honiton. Hooker’s reference to a “holy day” and his note that the army marched again six days later on Saturday 3 August both point clearly to Sunday 28 July as the date of the battle. Hooker and Hayward provide the principal accounts, though they differ in their interpretation. Hooker, generally the more reliable, states that the royal army marched out from Honiton to engage the enemy because the rebels had advanced to Feniton. Hayward, by contrast, claims that the rebels interposed themselves between Russell and his base after he had made an expedition towards Exeter, forcing him to fight his way back across the Otter. This scenario would have required Russell to return along the main London road from the west, a risky manoeuvre that would have separated the rebels from their headquarters and line of retreat. The topographical details in the accounts are far more compatible with a rebel deployment on the west side of the river, blocking the road to Exeter. A further complication comes from draft letters of the Privy Council referring to a skirmish “in the straights”, which Rose‑Troup interpreted as the land between Honiton and Ottery St Mary. This may represent an earlier, separate encounter that Hayward later conflated with the main battle.
The two armies presented a striking contrast. The King’s troops—professionals and foreign mercenaries—were a vivid sight: brightly coloured Tudor coats in reds, tawny yellows, greens and blues, with contrasting linings and sleeves, and banners that added further colour to the field. Opposing them were the rebel levies: men in farm clothing, leather jerkins, improvised armour and whatever weapons they could muster. The visual difference between the two sides would have been unmistakable as they faced each other across the Otter. The river itself offered the rebels a strong defensive position, especially given their lack of cavalry. Both Hooker and Hayward describe a rebel detachment holding the bridge. Hooker simply notes that after repeated attempts Russell was finally successful in taking it. Hayward provides more detail, saying Russell was unable to force the bridge directly and so sent his cavalry to ford the river at the foot of the bridge, causing the rebels to abandon the crossing and fall back on their main body. Hayward places this main body in “a great fair meadow behind the bridge”, a location Hooker describes as “the meadow beneath the bridge” and later as “a meadow near adjoining in the lower side of the bridge”. These descriptions, taken together, place the initial action firmly in the area west of the present bridge.
The present bridge probably occupies a position close to its sixteenth‑century precursor, though the exact alignment of the road and the bridge is uncertain. The steepness and depth of the banks, rather than the depth of the river itself, appear to have been the main obstacle. There may have been a minor realignment of the road after turnpiking. Ogilby’s 1675 itinerary confirms that Feniton Bridge corresponds to what is now Fenny Bridges, but its precise alignment cannot be deduced from his map or from other pre‑turnpike mapping. The parish boundary between Ottery St Mary and Feniton follows the road through Fenny Bridges and north‑west towards Feniton, and may preserve the line of an earlier road alignment across the meadow and river. The Ordnance Surveyors’ Drawing of 1806 hints at this, showing an irregular course to the road west of the bridge on an alignment south of the present causeway. The same map shows that the course of the Otter north of the bridge has been altered, and that a series of lesser streams and the mill leat once ran on the west side of the river, crossed by four bridges. Later drainage works, the construction of the railway, and the recent A30 bypass have all reshaped the landscape, complicating the task of locating the precise site of the initial clash.
Once the rebels abandoned the bridge, the royal army crossed and advanced into the meadow where the main rebel force had drawn up. The loyalists, better equipped and more experienced, quickly routed them. Hooker describes the moment vividly: the King’s forces “charged lively upon them, and they again as stoutly received the charge, but being an untrained multitude without either soldier or guide, they were soon broken and put to flight”. Brook suggests that while the rebels fought bravely, they had chosen a conventional deployment in open terrain and suffered accordingly against the military professionals in Russell’s army. Despite the disparity in training and equipment, the rebels fought well, withstanding, as Hooker put it, “a good store of blows and bloodshed”.
As the royal troops fell to plundering, they were surprised by a sudden rebel counterattack by 160 or 200 Cornishmen. The nature of the terrain in either of the potential battlefield sites, with its narrow lanes and high banked field boundaries topped with hedges, would have been ideally suited to concealing such a movement. Holinshed may refer to this moment when he writes that the rebels “got altogether again and abide a new charge, defending their ground”. The enclosed lanes would also have allowed reinforcements to arrive unseen, greatly contributing to the insurgents’ ability to mount their counterattack in the final stages. As soon as some or all of the royal forces had been rallied and set again in battle array—Hooker implies they formed in two bodies—they attacked once more, routing the rebels and driving them from the field.
The pursuit continued for two or three miles but was then abandoned, supposedly for fear of rebel reinforcements. Hooker’s story of Russell’s fool, Joll, throwing the advance into confusion by claiming “that all the county behind him was up and coming upon him” seems apocryphal, but Russell had good reason to be cautious. His force was small, he had already suffered one unexpected counterattack, and the surrounding countryside was hostile. Rebel losses were estimated by Hooker at 300 and by Hayward at 600. Hayward claims that the royal army suffered none killed, though Brooks has suggested royal losses of as many as one to two hundred. Hooker is clear that there were significant numbers wounded, noting that the attack on the bridge was carried “with the hurt of sundry of his company, amongst whom Sir Gawen Carew was one being hurt with an arrow in the arm”. The victory restored morale to the heavily outnumbered royal army, which Hayward claims had previously been subject to desertion and disaffection while stationed at Honiton. But the failure to destroy the rebel army meant they were able to fall back on the next major river crossing, while Russell retired to Honiton to await reinforcements.
The field long marked on old maps as “Bloody Meadow” has traditionally been taken as the site of the battle, and from Frances Rose‑Troup onwards most historians have repeated this location. Yet the primary accounts make it difficult to reconcile with what actually happened. That meadow lies well to the north of the main road, and if the rebels had stood there they would have risked having their line of retreat to Exeter cut off the moment the bridge fell. The descriptions given by Hooker and Hayward instead point to ground south or west of Feniton Bridge, much closer to the road and better suited to the rebels’ need to block Russell’s advance while keeping their escape route open. The lie of the land supports this: the river could protect their right flank, while old embanked enclosures and rising ground towards the north‑west could have sheltered their left. The long, narrow closes near Skinner’s Ash Farm and the high banks along the lane towards Feniton suggest that parts of this landscape were already enclosed in 1549, giving the rebels natural features to anchor their position.
Any attempt to define the battlefield must take in both the traditional site and this area west of the bridge. To the east of the river, a strip of ground needs to be included to allow for stray shot from the fight at the crossing. To the west, the area must extend far enough to cover the early stages of the rout and pursuit, where any surviving evidence is most likely to lie. The one place where archaeology is most likely to survive is the immediate area around the bridge on the west bank of the Otter, hemmed in by the river and the mill leat. This is where the first clash took place and where any dropped equipment or lost shot would have been concentrated.
Much of the traditional site has been damaged by the railway, the A30 embankments and later development, and the remaining ground is vulnerable because it lies so close to Feniton’s built‑up area. If handguns had been widely used, we might expect to find lead bullets scattered across the fields, but the contemporary accounts do not mention firearms or artillery at Fenny Bridges. This silence may simply reflect the limitations of early chroniclers, but it is also possible that few or no handguns were present. Spinola’s Italian handgunners had not yet joined the army, and much of the artillery train was still on the road. German mercenaries, who often carried arquebuses, may or may not have been present. If Hayward is correct that German cavalry did not arrive until after the battle, then firearms may have played little or no part in the fighting.
No confirmed battlefield finds have been recorded in the Historic Environment Record or the Portable Antiquities Scheme. A group of lead bullets found at Escot, three kilometres to the west, might relate to the pursuit, but could equally be unconnected. Without more detailed information, it is impossible to say. If bullets are absent, surviving artefacts may be few. The exception would be iron objects such as arrowheads, which can survive in certain soil conditions. The clayey alluvial soils around Fenny Bridges, combined with the fact that much of the land remained pasture into the nineteenth and twentieth centuries, may have helped preserve buried material. Earthworks of old river channels south of the main road also suggest areas that have seen little disturbance.
There may also be archaeological traces of earlier road lines, former bridge positions and abandoned channels of the Otter west of the crossing. The high embanked boundaries along the parish road towards Feniton, and similar features nearby, may help reconstruct the sixteenth‑century landscape. But any firm conclusions must await a proper battlefield survey. What can be said with confidence is that the fight at Fenny Bridges was shaped by a landscape of narrow lanes, high hedged banks, shifting watercourses and enclosed fields — a terrain that helped the rebels conceal their counterattack and allowed the royal army, once rallied, to drive them back. It was the first of several hard‑fought encounters that would carry both sides towards Clyst St Mary, Clyst Heath and finally Sampford Courtenay, but for a brief moment the quiet fields around Feniton formed the front line of Tudor England.

